What’s in a name?
Look, I’ve built more asset renaming utilities than I care to admit. From the UCS Renaming Tool to proprietary in-house tech at studios that will never see the light of day, I may not be the expert but I’ve certainly seen my fair share of things that work and things that don’t. If I’ve learned one thing:
There’s no best naming convention. But yours is pretty damn close.
The Last Renamer is a completely customizable renaming utility for content in REAPER. If your team or studio has a bespoke naming convention to fit the needs of your project(s), The Last Renamer will provide a clean and consistent way for everyone to adhere to that standard.
Does your naming convention need a dropdown that turns into a short-hand abbreviation? Do you need a checkbox to toggle whether a certain suffix gets added? Inter-dependent fields that only show up based on the prior value? The Last Renamer has you covered so let’s dive in!
Naming
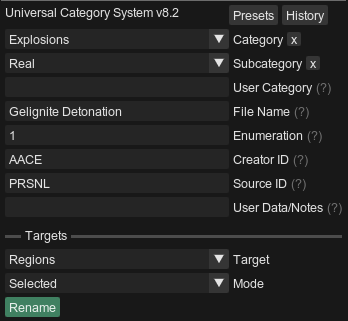
Let’s start with something familiar. The Last Renamer supports renaming with the Universal Category System, which can be loaded from the “Schemes” dropdown in the Settings tab.
As you can see here, there are dropdowns, text entry fields, and an enumeration that increments a number for each of the renaming targets in your project.
The Targets section at the bottom determines the content in your project that will be renamed.
Presets & History
The Last Renamer allows you to easily store common settings in the “Presets” menu. Simply type in the name of your new preset, click the “Save” button, and it will be ready for easy recall in the presets list. If you want to share your presets with others on your team, simply go to the “Settings” tab and use the “Export Presets” and “Import Presets” buttons.
The history menu works in a similar fashion, allowing you to easily recall a recent name. Found a spelling error in that one item right as you were about to render? No excuses now… fix it!
Metadata
Yeah, you read that right. The Last Renamer also supports embedding most common metadata fields! While not enabled by default, you can add the “Metadata” tab by going to the “Settings” menu and selecting “Enable Metadata Tab”.
This works by creating a META marker at the end of your item(s) or region(s). When you render that content and have the option “Add new metadata” checked in the render dialog, the META marker will be used to embed the respective info in each field!
Sharing
The Last Renamer was designed to allow for easily sharing your naming conventions across a team. For example, if your team uses Perforce, you can all sync the same naming conventions file by using the “Add Shared Scheme” button in the "Settings” menu. Whenever your project’s naming conventions are modified or updated, everyone on your team will receive the latest version the next time they sync!
Rhymes With Camel
YAML stands for “YAML Ain't Markup Language”. In less cryptic terms, YAML is designed as a language for storing data, not documents.
The Last Renamer uses YAML files to define a naming convention, also referred to as a scheme.
Why YAML?
Well, it’s pretty easy to pick up! YAML is fairly human-readable as far as text-based configuration files go (JSON, CSV, XML, etc). Most users will likely have no idea the YAML file even exists, but someone will inevitably have to set it up for your project.
If you want to get started writing the YAML file for your naming convention, click the “Scheme Documentation” button above!
Where do I find it?
After installing and setting up The Last Renamer (see below for instructions), go to the “Settings” tab and click “Open Schemes Folder”. To add your scheme, simply create a new text file with the .yaml file extension or copy-paste the Example.yaml file to serve as a basic template. That said, the example file is just a reference, and by no means should influence the way you design or constrain the limitations of your naming convention!
Installation
The Last Renamer is totally free and open source! But if you want to buy me a coffee, be my guest. :)
Prerequisites
ReaPack - A package manager for installing scripts in REAPER.
ReaImGui - UI framework for The Last Renamer, which should be installed automatically as part of the ReaTeam repository.
Install
In Reaper, run:
Extensions > ReaPack > Synchronize Packages…
If you do not already have my ReaPack repository installed, then you’ll need to copy and paste the following URL in Extensions > ReaPack > Import a Repository:
You can then search the Actions List for The Last Renamer and run the script!
Troubleshooting
If you don’t see it in the Actions List, double check by going to Extensions > ReaPack > Browse Packages and searching for The Last Renamer. Right click on it and select “Install”. You will also need ACendan Lua Utilities, which can be found by searching for ACendan Utilities. Right click, install, then click the apply button to install both!
Toolbar Icon
Stephen Schappler put together a nice little toolbar icon for The Last Renamer! Simply unzip it in your REAPER install's /Data/toolbar_icons folder, and the icon should show up in Reaper's toolbar icon customization panel. Download it here if you're interested!


